How to Disable Windows Defender on Windows 11
How to Disable Windows Defender on Windows 11 - All Windows series ranging from Windows XP to Windows 11 have been equipped with Windows Defender features from Microsoft. The feature, which has another name Microsoft Defender, is known as a kind of Microsoft-built anti-virus or anti-malware that has the basic function of protecting the Windows operating system from the threat of viruses or malicious files. In addition to Windows, in 2019, Microsoft also issued Microsoft Defender ATP aimed at Mac. A year after the release of Microsoft Defender ATP for Mac users, Microsoft is also bringing similar features to Android and iOS.
In short, Windows Defender is a built-in antivirus from Windows that helps us protect our computers and operating systems from threats of viruses or malware that may infect our computers.
 |
| How to Disable Windows Defender on Windows 11 |
In its use, windows defender is sometimes wrong in detecting a file. Not infrequently, the file we want to install or use is detected as a virus by Windows Defender, even though the file is not at all dangerous. Usually these cases occur when we will install an application, the installer that we will use will usually be detected as a virus by Windows Defender. In this article, we will discuss How to Shut Down Windows Defender Windows 11 so that we can continue installing the application smoothly without detecting a virus.
How to Disable Windows Defender on Windows 11
How to disable Windows Defender in Win 11 is actually quite easy to do, see how below.
1. Go to Virus &threat protection through Windows Security Windows 11
The first step is to go to Windows Security Windows 11 settings by going to Settings > Privacy & security > Windows Security and then you choose Virus & threat protection.
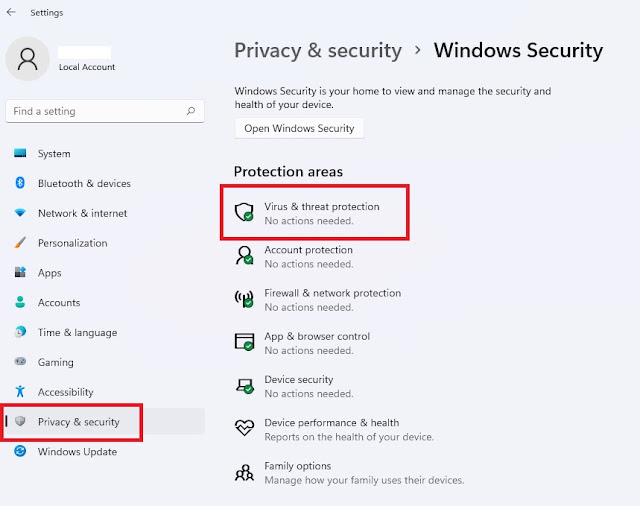 |
| Virus & threat protection |
2. Disable Windows Defender Protection
Next, under the words Virus &threat protection settings, click Manage settings. Finally, disable Real-time protection to turn off Windows Defender virus protection.
 |
| Click Manage settings |
 |
| Turn off Real-time protection |
Now Windows Defender virus protection has been disabled and you can start opening or installing files previously detected as viruses. If you want to re-activate the Windows Defender virus protection feature, you just need to repeat the same steps as above and reactivate real-time protection.
That's all the short tutorial on How to Disable Windows Defender on Windows 11 easily. Thank you for reading.